by Charles Oropallo | Nov 19, 2026 | Passwords, Security, Small Business, The CW Corner
 Hardware security keys are small devices that give your important accounts a strong, physical check at sign-in. You plug one into a computer or tap it against a compatible phone. Think of it as a small key that helps prove you are really you.
For most accounts, the security key is a second step after your password. Some services also let you use a key to sign in without entering a password. Either way, it can make fake login pages much less effective.
What is a hardware security key?
A hardware security key is a small device that connects through a Universal Serial Bus (USB) port or communicates wirelessly with a phone. During sign-in, you may need to touch its button or tap it against your device.
The key works with your browser and the service’s sign-in system. It helps confirm that you are signing in to the real website, not a convincing imitation.
Some keys include a fingerprint reader. Others ask you to touch a button. Either style can work well. Choose a method that feels comfortable and suits the accounts and devices you use.
You may also see keys described as supporting Web Authentication (WebAuthn) and Fast Identity Online (FIDO) standards. Those standards let websites and security keys work together for secure sign-ins. Check that the services you rely on support them.
Why does a key stop many phishing attempts?
A password or code can be copied. If a fake website tricks you into entering a password or a temporary code, the attacker may use it on the real account before it expires.
A hardware security key works differently. During sign-in, the browser and key use the website’s identity to check that the request is for the right service. A key registered for your real email provider will not answer a lookalike site pretending to be that provider.
Picture a key cut for one particular lock. A copied key shape may look convincing, but it will not turn the real lock. A security key uses a similar idea, with digital information instead of metal teeth.
This protection is why keys can resist phishing better than codes you type into a webpage. It does not make every account or device invulnerable. Use the key only on websites you opened yourself, and protect your devices, passwords, and account recovery options.
For another passwordless sign-in option, see Passkeys Explained: Signing In Without a Password. To compare common second-step methods, read Authenticator Apps vs. Text Codes: Which Two-Factor Sign-In Is Safer?.
What should you look for when buying one?
Start by checking that the key supports WebAuthn and FIDO standards. Well-known brands make these devices, but focus on compatibility rather than choosing based on a logo.
Consider how you will connect the key. A model with both a computer connector and a phone-friendly option can be useful if you sign in from both. Check your computer and phone ports before buying.
Buy two keys: one for regular use and one as a spare. Store the spare somewhere safe and separate from your everyday key. A backup does not help much if both keys live on the same key ring.
Some keys have a button you touch during sign-in. Others include a fingerprint reader. Either can be a practical choice. Follow the maker’s setup instructions, and keep the key protected from damage or loss.
Which accounts should you secure first?
Start with accounts that could unlock or disrupt many other parts of your life or business:
- Your email account. Password-reset links for many services arrive in your inbox. That makes email a kind of master key.
- Your domain registrar. Someone with access may be able to change where your website address points.
- Your web hosting account. Access could allow changes to your website or its hosting settings.
- Your bank and payment accounts. Protect accounts that handle business funds or personal savings.
- Your password manager. It may hold the sign-in details for many of your other accounts.
A password manager can help you use a different password for every service. Learn more in Password Managers: One Key for a Whole Ring of Locks.
If your email account is compromised, the damage can spread quickly through password resets. Our email account recovery walkthrough explains why that inbox deserves special attention.
How do you set up a key?
The exact wording varies between services, but the process is usually straightforward:
- Open the service’s official website or app yourself. Avoid starting from an unexpected email link.
- Sign in and open the account’s security or sign-in settings.
- Choose the option to add a security key, then follow the instructions.
- Give the key a name you will recognize, such as “Office key” or “Backup key.”
- While you are still signed in, add your spare key in the same session.
- Test that both keys work before closing the settings page.
Adding the spare right away matters. You may not remember to do it later, and recovering an account can be much harder if your only key disappears.
If the service offers recovery codes, print them and store them somewhere secure, away from your keys. Treat those codes like spare keys to the account. Do not leave them beside your computer or save them in an inbox that the account itself can unlock.
Can your phone act as a security key?
Modern phones can take part in secure sign-ins. Some can approve a login on another device, while many also store passkeys for accounts that support them.
Passkeys are related to security keys, but they are not exactly the same thing. A passkey is a digital sign-in credential stored on a phone, computer, or supported account service. A physical security key is a separate device you carry and connect when needed.
A phone that receives a text message is not the same protection as a physical security key. Text codes can be intercepted or stolen through phone-number scams. Learn about that risk in our article on SIM swap scams.
What are the trade-offs?
You need to have the key with you when signing in, unless you use another supported method. Some services limit how many keys you can register. Others do not support security keys at all.
Losing every registered key can lock you out. That is why you should set up a spare and save recovery codes before trouble starts. Check each service’s recovery process while you still have access.
A key also cannot protect an account if someone has already gained access another way, such as through an open sign-in session. Keep devices updated, watch for unexpected account alerts, and remove keys you no longer use.
A small-business security step worth planning
If employees or contractors can change your website, pay bills, or access customer information, consider issuing keys to those people. Keep a simple record of who holds each key and which accounts it protects.
When someone leaves, remove their key from the relevant accounts the same day. Treat it like a building key: record who has it, and collect or disable access when their work ends.
For a handful of accounts that could ruin your week if they were taken over, hardware security keys are worth considering. Start with your email, domain, hosting, banking, and password manager accounts. Add a spare, save recovery codes, and ask for help if setup gets confusing.


by Charles Oropallo | Nov 18, 2026 | Domains, Technical Help, The CW Corner, Web Hosting
 Moving your website to a new host can feel like a risky technical project. With a little preparation, it’s usually a series of manageable steps, not a reason to panic.
You might be changing hosts because costs have climbed, support is hard to reach, or your site feels slow. Perhaps you have security concerns, or the developer who managed everything has disappeared. Those are understandable reasons to review your hosting.
But “the grass might be greener” isn’t much of a plan by itself. First, name the problem you want to solve. Then check that the new host can address it. A clear reason helps you compare providers and avoid moving the same problem somewhere new.
Keep your domain name
The decision that matters most is often the simplest: keep the same domain name. Your domain is your web address. Hosting is where your website’s files and related services live. Email is another service, even when it uses the same domain.
These pieces are connected, but they aren’t one thing. In many migrations, you change where the website lives without changing the address customers type into their browsers.
You usually do not need to transfer your domain registration to a new company just to move hosting. Keeping the domain where it is can reduce unnecessary changes. For more on protecting domain access, read why your domain lock matters.
Make an inventory before the move
Before anything changes, write down what your website depends on. You don’t need to understand every setting. You do need a list someone can check.
Include these items:
- Domain and access: Which company is the registrar? Who controls its login and recovery email?
- Domain Name System (DNS) records: Where are the current records managed? Ask for a copy of the full set.
- Email: List mailboxes, forwards, aliases, and whether email is included with your current hosting.
- Website data: Note the files, databases, and any special configuration your site needs.
- Secure Sockets Layer (SSL) certificate: Confirm how the new host will provide and install the certificate.
- Scheduled tasks: Ask whether any recurring jobs run behind the scenes. These are sometimes called cron jobs.
- Connected services: List payment processing, contact forms, newsletters, analytics, bookings, and other outside accounts.
- Paid themes and plugins: Record their names and check whether licences are tied to the old host or a particular account.
A hosting control panel may show some of these services. If you’re unsure where to look, see what your hosting control panel actually does. A simple inventory can prevent a small forgotten setting from becoming a very inconvenient surprise.
Take your own backup first
Before anyone touches the live site, make a full backup and copy it somewhere you control. Ideally, keep it somewhere separate from both hosting accounts.
Don’t rely only on the new host’s migration tool. Those tools can be useful, but your own copy gives you another way back if something goes wrong. Check that the backup includes both the website files and its database.
Ask how the backup can be restored, too. A backup is much more reassuring when you know it can actually be used. Our guide explains what website backups cover, and what they don’t.
Test the new copy before changing DNS
Ask the new host or developer to provide a temporary or preview address. This lets you inspect the migrated website before visitors are sent to it.
Check more than the homepage. Try important pages, images, logins, contact forms, and any checkout or booking steps. Forms may look fine but fail to deliver messages. A checkout may load but not complete correctly. Images might be missing because their files didn’t make the trip.
Think through a real customer visit. Can someone find a service, fill out your form, and receive a useful response? Find problems on the private copy, not after the public switch. If testing could trigger real orders or messages, ask how to avoid duplicate notifications or charges.
Lower the DNS timer ahead of time
About a day before the planned switch, ask whoever manages your DNS to lower the records’ time to live (TTL) value.
TTL is a cache timer. It tells internet services how long to remember where your website lives before checking for updated directions. A shorter timer can help more visitors pick up the new server sooner after the change.
This step doesn’t move the website or guarantee an instant switch. It simply reduces how long some services may keep using older directions. If you’re unsure which records to adjust, ask your host or developer. Avoid changing unrelated records.
Point the domain to the new server
When the new copy is ready, the person managing DNS changes the relevant records so they point to the new server.
For a while, some visitors may reach the new site while others still see the old one. That can happen because internet services update their stored directions at different times. It’s usually temporary.
Keep this period in mind if your site accepts orders, bookings, or other information that changes often. Ask your developer whether new activity needs to be paused or copied over during the switch. Don’t assume both copies will automatically stay in sync.
Give email special attention
Email is the part people often forget. Mailboxes, saved messages, forwards, and aliases do not always move with the website. If you use hosting-based email, the mail service may be changing too. If your email uses a separate provider, it may need to remain untouched.
Before the switch, confirm which company hosts each mailbox. Ask who will recreate the accounts, whether existing messages will be copied, and how to check both sending and receiving. Include shared addresses such as info@ and addresses that forward to staff.
Mail-related DNS records need careful handling. Mail exchange (MX) records direct incoming email. Sender Policy Framework (SPF), DomainKeys Identified Mail (DKIM), and Domain-based Message Authentication, Reporting, and Conformance (DMARC) records help other providers verify email sent from your domain.
If these records are missing or copied incorrectly, messages may fail or land in spam. Ask for the existing email-related records to be copied exactly unless your email provider gives different instructions.
Losing access to a working mailbox during a website move is one of the most common self-inflicted problems. Confirm the email plan before the switch, not after an important message goes missing.
Keep the old host as a fallback
Don’t cancel the old hosting account as soon as the new site appears to work. Keep it available while you check the new setup and confirm that nothing still depends on it.
Give the new site time to run cleanly for a couple of weeks before cancelling the old service. The right timing can depend on your setup, so ask your host or developer what they recommend.
Check the site after the switch
During the first days, test the parts your customers rely on:
- Submit forms and confirm messages arrive at the right address.
- Check logins, images, and important pages.
- Test email sending and receiving from each relevant mailbox.
- Review notices in Google Search Console, if you use it.
- Visit the site using its secure address and check for browser warnings.
Your site should show a working padlock and certificate on its secure pages. If you see a warning, contact your host or developer rather than telling visitors to ignore it. Learn more in our plain-language guide to the SSL certificate and padlock.
If something looks wrong, record what you saw and when. Our calm first-hour website outage checklist can help you gather useful details before contacting support.
Keep a record and ask clear questions
Write down what changed and when. Keep the important logins and provider details together in a secure place, with access for the right person in your business.
If your current developer holds the keys, request a written handover of the domain and hosting accounts before you start. You should know who controls each account and how your business can regain access.
Finally, ask the prospective host what its migration help actually covers. Does it include email? Testing? DNS changes? Fixes if a feature fails? Clear answers make it easier to plan a calm, careful move. You don’t have to do every technical task yourself, but you should know what is being moved and who is responsible for each piece.
by Charles Oropallo | Nov 17, 2026 | Security, Technical Help, The CW Corner, Website Development

A website hacked warning can turn an ordinary workday into a stressful one. Take a breath: a hacked site is a fixable problem, not the end of your business. Don’t delete the site or wipe everything in a panic. First, preserve what you have, then work through recovery in order.
How you might discover a hack
Sometimes Google shows a warning beside your website in search results. Your hosting provider might email you about suspicious activity. Or a customer might say your site sent them somewhere unexpected.
Other clues can be less obvious: unfamiliar administrator accounts or files, pages you never wrote appearing in search results, or a site that suddenly feels slow. Some hacks are silent. You may hear about the problem from someone else before noticing anything yourself.
Google’s guide, How do I know if my site was hacked?, explains that harmful changes can be hidden from site owners. So, a normal-looking homepage is not proof that every page is clean.
Step 1: Take a snapshot before changing anything
Before you start cleanup, ask your host or developer to save a full copy of the website files and a separate copy of the database. The database holds your posts, pages, settings, and other site information.
Write down the exact date and time of the snapshot. Keep this copy separate from the live site, and label it clearly as a snapshot of the site as found. Do not treat it as a clean backup.
Why bother keeping a copy of a compromised site? It can help show what changed and when. It may also help a technician identify how someone got in. A backup created after the break-in can carry the problem forward, so don’t restore it as if it were known-good.
For more on what backups contain, read What Website Backups Actually Cover (and What They Don’t).
Step 2: Close the way in
Once the snapshot is safely kept, change the passwords connected to site access. This includes your hosting control panel, WordPress administrator accounts, file transfer accounts, and database.
File Transfer Protocol (FTP) and Secure File Transfer Protocol (SFTP) are methods for accessing website files. If you use either, change its password too. Coordinate the database password change with your host or developer, since the website may need updated settings to connect afterward.
Sign out active sessions where you can. Review the list of WordPress administrators and hosting file transfer accounts. Remove any account you do not recognize, but record its details first.
Make password changes from a clean, trusted device. If an account or computer may also be compromised, ask a qualified technician for help before entering new credentials.
Step 3: Find the entry point honestly
Cleanup is not complete if the way in remains open. Common causes include outdated WordPress software, plugins, or themes; weak or reused passwords; and stolen logins from a phishing page or infected computer.
A compromised account on shared hosting can also create problems for neighboring sites. Your provider can help investigate whether the hosting environment is involved.
Look for evidence with your host or developer. That may include unfamiliar accounts, unexpected files, unusual site changes, or activity in available logs. A log is a record of events on your website or server.
Don’t settle for removing the strange page you can see. The visible symptom may be only one sign of a deeper problem. Our older article, Best Practices for Mitigating Website Hacks, covers ways to reduce the risk of another incident.
Step 4: Choose between a clean restore and cleanup
The right recovery method depends on what happened and what backups are available. If you have a verified, known-good backup from before the intrusion, restoring it may be the clearest route.
But first, close the entry point. Restoring an old copy without fixing the cause can simply reopen the same hole. Check that the backup is trustworthy and does not include the attacker’s changes.
If no suitable backup exists, a qualified professional may need to clean the site in place. This means inspecting and repairing the files and database that make up the current site. Malware can hide in places a basic scan misses, and injected content may live in the database, not just website files.
Google’s Security issues report guidance also recommends fixing the issue throughout the site, not just on example pages. If the work is beyond your comfort level, get help. Guessing at unfamiliar code can make recovery harder.
Step 5: Request removal of Google warnings
After the site has been cleaned or safely restored, check Google Search Console’s Security issues report. It may identify examples of affected pages and explain what Google detected.
Fix all the listed issues, then request a review through the report. Describe what you found and what you changed. Google needs to review the site before removing its warning.
A website that looks normal to you may still have a warning in Google results or browsers. The warning will not necessarily disappear just because the site appears fine now. Google’s review process can take time, so check the report for updates.
If you need an introduction, see our guide to Google Search Console.
Step 6: Tell customers plainly
If customers may have seen redirects, suspicious pages, or a browser warning, send a short, honest note. Silence can leave people confused and make them wonder whether you know about the problem.
For example:
We recently discovered unauthorized changes to our website. We have secured the site and are investigating how the changes occurred. If you visited during this period and entered information, please contact us using the details below. We’ll share relevant updates as we learn more.
Adjust this wording to match what you know. Don’t claim customer information was exposed unless that has been established. Don’t blame an unnamed “third party” as a way to dodge responsibility. Be clear about what happened, what you did, and what customers should do.
Step 7: Report the incident where it matters
Tell your hosting provider about the intrusion. Share relevant details and ask whether they see activity affecting your account or hosting environment. Depending on what happened, you may also need to contact your payment provider, insurer, or other relevant reporting channels.
If customer data or payment details might have been exposed, this becomes a different conversation. Notification and legal duties can depend on the information, location, and circumstances involved. Get qualified legal advice rather than guessing about what you must do.
Step 8: Reduce the chance of a repeat
Once recovery is underway, keep future care practical and manageable. Keep WordPress, plugins, and themes updated. Use unique, strong passwords and two-factor authentication (2FA) for administrator access.
Remove plugins and themes you no longer use. Keep regular backups in a separate location, and test a restore before an emergency. For more prevention guidance, see our article on mitigating website hacks.
The business cost of a hack
A hack can cost more than cleanup time. Customers may hesitate to visit or submit a form. Search warnings can interrupt new enquiries, and your staff may spend valuable hours answering questions instead of serving customers.
That is why the awkward customer email is often cheaper than silence. A clear update gives people a reason to trust your next message. A site you cannot restore to a known-good state can also cost far more than a sensible backup routine.
Recovery is easier when you know who to call, where your backups live, and what they include. Ask your host or developer those questions before a crisis, not while one is unfolding.
Work through the steps, and ask for help
A website hack is upsetting, but you do not have to solve everything at once. Preserve a snapshot, close the way in, investigate the cause, and choose a careful cleanup or restore.
Write down what you do and when. Get help early rather than guessing, especially if you cannot confirm the site is clean. A calm, documented recovery is a much better plan than a rushed wipe.
by Charles Oropallo | Nov 16, 2026 | Email, Security, Small Business, Technical Help, The CW Corner
 Calm, careful steps can help you regain control and protect the accounts connected to your email.
A hacked email account can first show itself in an ordinary, unsettling way. A friend asks why you sent them a strange link. Contacts receive replies you never wrote. Your sent folder contains unfamiliar messages, or your password suddenly stops working. Maybe your provider sends a security warning, or mail you expected never arrives.
Take it seriously, but take it one step at a time. Your mailbox is a master key: password-reset links for many other accounts land there. Here’s what to do, in order.
First, pause. Don’t reply to the thief.
Don’t panic, and don’t email your account asking who is there. You may only give the intruder another chance to read your response. Don’t click links or open attachments in suspicious messages, either.
If you can, use a device you trust for the recovery steps. If the device seems infected or behaves strangely, use another trusted device.
Step 1: Get back into your account
Go directly to your email provider’s official website or app. Don’t use a sign-in link from an unexpected message.
If you’re locked out, type the provider’s official account-recovery address into your browser yourself. Follow its instructions, and be ready to wait while it verifies that the account belongs to you. That wait can be frustrating, but it’s safer than trusting a stranger who offers a shortcut.
Step 2: Change the password
Once you regain access, change the email password first. Choose a password you haven’t used elsewhere.
Then change it anywhere else you reused it. Reusing one password is what can turn one break-in into several: if someone learns it from one account, they can try it on others.
Start with accounts that can reach money, sensitive information, or more account-recovery options. A password manager can help you create and keep unique passwords.
Step 3: Check the settings that are easy to miss
A password change doesn’t necessarily remove quiet changes made inside your mailbox. Go through the security and mail settings carefully. Remove or correct anything you don’t recognize.
Check for:
- A new recovery email address or phone number.
- A forwarding rule or filter that copies, hides, or moves incoming mail.
- A filter that deletes replies or security alerts.
- An app password or unfamiliar connected third-party app.
- A changed email signature or automatic reply.
- A delegate or shared-access setting you didn’t add.
- A new folder that files replies out of sight.
Forwarding rules and filters are especially easy to overlook. They can keep copying or hiding messages even after you change your password. That could let someone watch for password-reset emails, or keep you from seeing replies.
If you find something suspicious, remove it and note what it was. Review the settings again after making changes to confirm they haven’t returned.
Step 4: Sign out other sessions
Use your provider’s security settings to sign out of every session and device. This matters because changing your password may not close every session that was already open.
Then check recent sign-in or security activity. Look for places, times, devices, or browsers you don’t recognize. If anything seems unfamiliar, record it and use the provider’s security or abuse-report channel.
Step 5: Check which accounts the mailbox could unlock
Your email account may help someone reset access to other services. Check the accounts connected to it, including:
- Bank and credit card accounts.
- Payment processors.
- Your domain registrar and website hosting control panel.
- Social media accounts and cloud storage.
- Supplier, customer, or other business portals.
Change passwords for those accounts, too. Start with money and domains. If someone controls your domain or hosting account, they may be able to disrupt your website or use your business identity.
Step 6: Warn people and contact your bank
Your name is now a trusted sender in your contacts’ inboxes. Let people know through a separate, trusted channel, such as a phone call or a different email account.
You can keep your warning plain:
My email account was compromised. Please don’t open recent links or attachments from me. I will never send a link asking for your password or payment.
Tell your bank the same day. If money moved or a card was used, contact your card issuer that day, too. Use the number on your card or the institution’s official website.
Step 7: Report the incident and keep notes
Report the problem through your email provider’s own security or abuse channel. If personal identity details were exposed, use the Federal Trade Commission’s IdentityTheft.gov recovery steps.
Keep a short record of dates, unfamiliar changes, account contacts, and the fixes you made. Those notes can help if you need to explain what happened or follow up later.
Step 8: Make the next break-in harder
Once your account is clean, take a little time to strengthen the setup:
- Turn on two-factor sign-in with an authenticator app rather than texted codes. For setup context, see our guide to authenticator apps and text codes. The Cybersecurity and Infrastructure Security Agency’s guidance also encourages businesses to require multifactor authentication.
- Remove recovery email addresses and phone numbers that no longer belong to you.
- Use a password manager so each account has a unique password.
- Type a website address yourself instead of trusting a sign-in link in a message.
- Check whether a breach-notification service can alert you if your email address appears in a known data breach.
A stolen password from an old website is often how someone gets into a current mailbox. If your recovery phone is involved in a phone-number takeover, read about Subscriber Identity Module (SIM) swap scams.
If you run a business, check these risks too
A message with your name or logo can feel trustworthy to customers. An intruder may exploit that trust by sending fake invoices or changing bank details in a payment request. Warn customers and suppliers if they may have received suspicious messages.
Your mailbox may also control access to your domain registrar and hosting account. Make sure those accounts are protected, and review their recovery settings.
For a business, recovery email addresses and phone numbers should not depend on one person’s personal phone alone. Plan who can regain access if that person is unavailable or loses the device.
Keep going, and ask for help if you need it
An afternoon spent recovering and securing your accounts now can spare you a very bad week later. Work through the steps in order, and don’t leave suspicious settings for “sometime later.”
If this feels over your head, ask for help rather than leaving the recovery half done. Hopefully, these steps will help you regain control with a little more confidence.
by Charles Oropallo | Nov 15, 2026 | Scams, Security, Small Business, Technical Help, The CW Corner
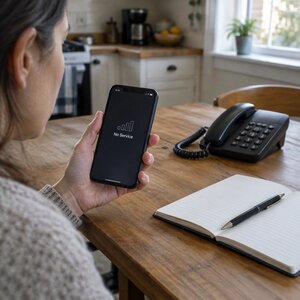 A SIM swap scam can turn your phone number into a key to your email, bank, and business accounts. If your phone suddenly loses service without explanation, don’t dismiss it as a glitch. It could be a warning that someone else now controls your number.
What is a SIM swap?
A subscriber identity module (SIM) card is the small chip that connects your phone number to a mobile phone. A swap happens when someone persuades your mobile carrier to move your number onto a SIM card they control.
Once the transfer takes effect, your phone may lose service. The scammer’s phone can start receiving calls and text messages intended for you. A transfer to another carrier, often called a port-out, can create a similar problem.
The SIM itself isn’t the important prize. Your phone number is. Many online accounts use it to send sign-in codes, password-reset codes, bank alerts, or calls from a fraud team. If a criminal controls your number, they may be able to receive those messages and answer those calls.
A stolen number does not automatically unlock every account. But it can give a scammer a useful route into accounts that rely on your phone for verification or recovery. That’s why a sudden loss of service deserves attention.
How does the scammer get your number?
Usually, the criminal does not hack your carrier’s network. They contact the carrier and try to convince a representative that they are you.
They may gather personal details from data breaches, social media, phishing messages, or other sources. Then they use those details to request a replacement SIM or move your number to another carrier. In some cases, an insider at a store may help.
The basic trick is impersonation, backed by patience. A caller may sound confident, know just enough about you, and keep trying until someone approves the change.
That’s also why you should be cautious if someone contacts you and asks for a carrier passcode or a one-time sign-in code. Hang up and contact the company using a number from your bill, card, or its official website. Don’t hand over account keys to an unexpected caller.
Warning signs to take seriously
These changes can have harmless causes, including local outages or a damaged phone. But if they appear suddenly and you haven’t changed your service, treat them as urgent.
- Your phone shows “No Service” or “SIM not provisioned” in a place with normally good coverage.
- Your phone suddenly allows emergency calls only.
- Your carrier sends a message about a SIM change or number transfer you did not request.
- Your number appears to have changed in an account, or you receive a welcome message from a new carrier.
- You are unexpectedly locked out of accounts or receive password-reset alerts you did not request.
The Federal Bureau of Investigation (FBI) has warned that criminals use these schemes to reach bank and social media accounts. See its alert on SIM swap schemes.
If your phone loses service for no clear reason, don’t wait around hoping it will sort itself out. A quick response can help limit what a thief can do.
What to do in the first hour
If you suspect a swap, borrow another phone or use a landline. Don’t rely on the affected phone to make calls or receive verification messages.
First, call your mobile carrier from that other phone. Use the number on your bill or the carrier’s official website. Explain that you suspect an unauthorized SIM change or number transfer. Ask the carrier to freeze the number, stop further changes, and restore the number to your SIM.
Ask what additional protections the carrier can put on your account. If the first person you reach cannot help, request the team that handles suspected account or number-transfer fraud. Keep notes about your calls and any case references.
Next, secure your email account. Email is often the master key because password-reset links for other accounts may arrive there. From a trusted device, change the email password if you can. Review recovery details, sign out of unfamiliar sessions, and check for forwarding settings you did not add.
Then contact your bank and card issuers. Tell them you may have lost control of your phone number. Ask them to review recent activity and flag anything unfamiliar. Follow their instructions if they recommend temporarily restricting access.
Finally, change passwords on financial and business accounts. Prioritize accounts that use your number for recovery, or that could affect your money, website, domain, or customer communications. A password manager can help you create unique passwords instead of reusing one. Our password managers guide explains how to get started.
For more recovery guidance, the Federal Trade Commission’s identity theft resource offers steps for people who discover misuse of their personal information.
Practical ways to reduce your risk
Call your carrier before anything goes wrong. Ask whether it offers a port-out PIN (personal identification number), number-transfer freeze, or account passcode. Ask how to enable available protections and whether a store visit can override them. Carrier options and procedures vary, so check directly with your provider.
Where important accounts allow it, move away from texted sign-in codes. Consider an authenticator app or security key instead. These options don’t rely on a text arriving through your phone number. Our guide to authenticator apps and text codes covers the sign-in choices. You can also read Passkeys Explained for another option some services support.
Keep a separate recovery email that does not depend on the same phone number. Make sure you can access it, and protect it with a strong, unique password.
Be careful about details you share online. A birthday, pet’s name, or mother’s maiden name may also be an answer to a security question. Think twice before posting personal facts that could help someone impersonate you.
A business number can put customers at risk, too
If the number on your website or business listing gets swapped, customers may reach the person controlling it instead of you. That can mean missed inquiries and confusion. The same number may also help someone reset business accounts connected to it.
Review which phone number is attached to your email, banking, domain registration, website administration, and other important services. Ask whether a single person’s personal mobile number should control all those accounts.
For a small business, a shared or separately managed business line may make more sense for some account recovery arrangements. Whatever number you choose, know who controls it and what protections your carrier can apply.
Make the carrier call this week’s small job
A SIM swap scam is rare, but it is not imaginary. If your number suddenly stops working, act promptly: contact your carrier, secure email, alert financial institutions, and then protect your other important accounts.
The preparation doesn’t need to become a major project. One call to your carrier, followed by an afternoon moving important accounts to better sign-in methods, can make a meaningful difference. Make that call this week, while your phone is still working.
by Charles Oropallo | Nov 14, 2026 | Do-It-Yourself, Small Business, Technical Help, The CW Corner, Web Hosting, WordPress
 Website backups sound reassuring, but “we have backups” answers a question nobody finished asking. What gets copied? Where does it live? And could it actually restore your site?
Those details are the fine print. Knowing them can help you understand what a backup protects, what it leaves out, and what to ask your host or developer.
What a typical WordPress backup contains
A typical WordPress backup has two parts: the database and the website files. You need both to restore a complete site. WordPress explains the two-part backup in its documentation.
The database: what your site says
The database holds much of your site’s changing information. That includes posts, pages, users, settings, plugin configuration, and comments.
Think of your site as a house. The database is what’s written on the walls: the words, arrangements, and instructions that make the place yours.
The files: what your site uses
The files include WordPress itself, themes, plugins, and uploaded images and documents. Depending on your setup, they may also include other site code and related files.
In the house analogy, the files are the furniture and pictures. They give your content its look and provide the tools that make features work.
Neither half alone gives you your whole site back. Files without the database may leave you with an empty framework. A database without the files may have words and settings, but not the right images, design, or working features.
Ask whether your backups include both parts, saved together as a usable set. The WordPress backup guide explains why files and database data need separate attention.
Where the backup lives matters
A backup copy stored on the same server as your website may disappear with that server. If the server fails or becomes inaccessible, both the site and its nearby copy could be affected.
An off-server copy is stored somewhere separate from the website’s own server. In plain terms, it’s another copy kept elsewhere, rather than a spare tucked beside the original.
Access matters, too. If the backup folder is available through the same account used to administer your site, an intruder with that access might delete or encrypt the copies. That makes the backups less useful when you need them most.
Ask who can reach the copies and how they’re protected. At The CharlesWorks Corner, our arrangement keeps copies on separate servers that site administrators cannot reach. That’s one example of an important detail to understand.
For more background on hosting settings, see what your hosting control panel actually does.
What website backups do not cover
A website backup is not a complete copy of your business or everything connected to your online presence. Here are a few things it may not include:
- Your domain registration. A restored website does not renew or recover the name customers use to find you. See what happens when your domain expires.
- Business email messages. If your mailbox lives outside your website hosting account, website backups may not include its messages.
- Third-party accounts and analytics history. Accounts with outside services, saved reports, or past tracking data may live elsewhere. A site copy may not restore them.
- Tracking setup. Website code or settings that connect a tracking service might be included, but the third-party account and its history are separate questions.
- Social profiles. Your business’s social media pages and their content are not part of a website backup.
- Search rankings, reviews, and reputation. A restore does not bring back lost visibility, customer reviews, or confidence.
- Time and trust. Backups cannot give back the hours spent fixing a partly broken site or the customer trust affected while it was unavailable.
There’s another subtle limitation: a backup cannot contain changes made after that copy was created. If a problem went unnoticed for a while, it may already exist in every copy still available.
And restoring a clean copy does not explain what caused the break. If the cause remains, the same problem may return. A restore can help recover the site, but the underlying issue still needs attention.
Our older note on nightly website backups discusses backup timing. This article focuses on what those copies cover.
Questions to ask your host or developer
Ask for clear answers to these questions. Write them down so you can find them later.
- What gets backed up? Does the copy include both the database and files, or only one?
- How often are copies made? Ask what schedule applies to your particular site.
- How long are copies kept? How far back can you reach?
- How does a restore work? Who performs it, and does it cost extra?
- Where do the copies physically live? Are they stored away from your website’s server?
A vague answer to any of these questions is worth chasing. “It’s backed up” may sound comforting, but you deserve to know what that means in practice.
Why the retention window matters
Retention means how long your provider keeps backup copies before removing or replacing them. That window determines how far back you may be able to go.
If a problem is discovered late, you may need a copy older than the window holds. In that case, every available copy could already include the unwanted change or the hidden problem.
Ask how many days your provider keeps copies, and whether you can access older ones. Don’t assume a particular window without checking.
Test a restore before you need one
A backup that has never been restored is a hope, not a plan. A completed backup job does not, by itself, prove that the copy can rebuild your site.
Ask your host or developer to restore a copy into a separate folder or staging site. A staging site is a private version used for testing, away from your live website.
Check that key pages, images, and features appear as expected. For a site with forms or other important functions, ask how those can be checked safely.
Do this once in a while, not during a crisis. A successful test gives you practical confidence and may reveal gaps while there’s time to address them.
Take a fresh copy before important changes
Some routine changes can create problems, even when they’re sensible. Make sure a fresh backup is available just before a plugin or theme update, adding a new form, giving someone administrator access, or making a major content edit.
You don’t need to turn every small adjustment into a technical production. Just build a quick backup check into the changes that could affect important parts of your site.
Our guide to a website maintenance routine you will actually keep can help you make that check part of regular care.
Keep a simple website inventory
Create a one-page inventory with the basics: where your site is hosted, who your domain registrar is, what backup arrangement is in place, and who to call for help.
Keep a copy offline and share it with one other trusted person. If something goes wrong, your business won’t depend on one person remembering every provider, login, or arrangement.
If you need help understanding your hosting or backup setup, ask your host or developer to walk you through it. There’s no need to know every technical detail. A clear answer about what’s covered is a very good place to start.










 European Union General Data Protection Regulation Compliant