by Charles Oropallo | Aug 21, 2022 | Do-It-Yourself, The CW Corner
Many costs for energy have risen in recent months. Here in the Northeast our electric bills just suffered a 110% hike. For the math challenged: that’s more than doubled!! The change was this:
- OLD RATE pre 8/1/2022: 10.669¢ per kWh (kilo or thousand watt hours)
- NEW RATE post 7/31/2022: 22.566¢ per kWh
I operate CharlesWorks from my home. So this applies to home services. We run many web servers and computers here so the electric rate increase resulted in an immense change. Saving money on electric is important to everyone.
Saving Money on Electric through Research
The biggest hassle I ran into was simply understanding my electric bill. The monthly electric bill has gotten quite complex. There are two basic parts to my electric bill:
- Supplier: This is the part of the electric bill that just increased from 10.669¢ to 22.566¢ per kWh. This is the part that we can shop around for better pricing on.
- Delivery: This is the part of the electric bill that will remain constant. This seems the most complicated because there are a number of components (8 on my bill) listed in this. The total on my bill for these delivery charges ended up at 12.21¢ per kWh. Whatever this total amount is on your bill should not change should you switch suppliers. So this cost should remain the same.
I did a lot of research on this. Hopefully this will save you the hassle of researching. Ultimately, I discovered that the process is, like many things we study, learn and practice, quite straightforward.
To switch my electric supplier there were a couple of prerequisites I needed assurance of:
- That my electric bill was actually going to go down. Sounds over-simplistic but I am cautious when it comes to ongoing expenses.
- That there were no cancellation fees should I change my mind if the power rate were to lower. I’ve not really seen that happen before – but just in case.
Moving to Direct Energy
 I decided to switch to Direct Energy. After a lot of researching around and talking to several others, I found they were the best of all worlds:
- LOW RATE: Direct Energy offers the lowest kilowatt hour rate at 16.59¢ kWh which was the lowest I could find.
- NO CANCELLATION FEE: Direct Energy offers switching to a 36 month contract with no cancellation fee should I move away. Most other companies I researched imposed at least a $100 cancellation fee.
- REFERRAL FEE: Direct Energy offers a referral fee. If you refer someone else to them who signs up they will give you a $50 referral fee. You can’t go wrong there. Mine is http://www.directenergy.com/refer-a-friend/raf/D866981 and if you click on that you can get started saving like I did.
- $50 FOR SIGNUP: At the time of this article Direct Energy is offering a $50 Visa Prepaid Card for signing up using a friend’s referral – so you can get this by using my referral code.
Here is the information you will need to switch over to Direct Energy. You should have this info handy when you sign up. It is all on your current electric bill:
- ACCOUNT NUMBER: You’ll need your current electric or gas bill Account Number. On my bill it was listed on the upper left corner of the first page.
- CUSTOMER NAME KEY: You’ll need what is called the Customer name key. On my bill it is 4 letters located in the upper left corner of the second page of the electric bill.
So switching really was a no brainer in light of the worst PSNY/Eversource electric power rate increase I have ever seen.
Act Now
I can’t say how long this rate or particular deal will remain in effect. I can only encourage you to act now while the offer is happening.
Just CLICK HERE to take advantage of this offer while it lasts!


by Charles Oropallo | Jun 30, 2022 | Do-It-Yourself, Email, Internet, Passwords, Security, Website Updates, WordPress
We at CharlesWorks are often asked by our web clients if their site is protected from malware and getting hacked. They also want to know if there site IS hacked, whether there be a charge to fix it.
The totally hack-proof website
The totally hack proof website has no access to it. So it’s not connected to the Internet. No one can view it. Such a website doesn’t sound like its of much use if no one can see it.
So, let’s agree that it is unrealistic to believe that a publicly accessible website can be totally hack-proof. Any website that is accessible via the public Internet is consistently subjected to attempts to break into it. Believe it or not, that’s the norm as opposed to the anomaly.
That being said, however, there ARE things you can do to mitigate website hacks. I have to stress the word mitigate here. Mitigation is defined as the action of reducing the severity, seriousness, or painfulness of something.
Site hacks are based on odds
My goal here is to simply remind you of what you most likely already know: that we can reduce the probability – the odds – of your site being hacked. We at CharlesWorks want that probability to be so low that it hopefully it doesn’t ever happen to you.
The major hacking causes
I have been operating CharlesWorks since 1998. In my experience, there appear to be two major reasons why sites get hacked:
-
- The access credentials/passwords have been compromised.
- The software that operates them wasn’t kept up to date.
Lets take a look at each of these below.
Compromised Access Credentials
Compromised passwords and bad actors gaining access to website login credentials is the major reason we see sites hacked. Think about this in terms of your car. You could have alarms on it. But if you make a copy of your car key and give it to someone, they can do whatever they like with the car. Whether its a drive along the beach or to rob a bank, your car is theirs to use with the key you gave them. Credentials – log in and passwords – work pretty much the same way.
CharlesWorks has many clients who want to be able to do things themselves. We are strong proponents of doing it yourself when it’s feasible and convenient. This is especially true for adding posts or page materials. It also makes sense when making other changes or modifications to your site. It is, after all, YOUR website.
However, many people fall prey to phishing schemes. Directly or indirectly, they usually end up tricked into giving out their website access credentials (as well as credentials to everything else they own). This is especially true if your email account is hacked and the hackers are able to access emails containing your website’s (and other) login credentials.
This problem is exacerbated if you have shared your website’s administrative or other access with others. Think of your emails containing various authorizations or login information as a potential weak link in a chain. If you have shared that information with others you have now created more weak links. This increases the odds of a potential compromise.
One of the best ways to mitigate these situations is to change your site’s access passwords so they are different than those possibly stored in your emails. And, to hope that anyone you may have shared your website access with has done the same.
Obviously, should site access be gained in such a manner, it would be your burden to have the site restored. I’ll expound upon this a little more at the end of this article.
Out of Date Security/Software Updates
Malware and virus protection on home computers operates a little differently than the same types of protection on servers. Website servers operate in the publicly accessible Internet. This results in many more entry points for potential issues. There are a number of very standard server protections available (which we utilize here at CharlesWorks).
After bad actors getting (or guessing) your passwords, the next major reason sites get hacked surrounds unapplied security updates and other software update issues. At CharlesWorks we mitigate such issues by running anti-malware software on our servers. Also, WordPress sites hosted on our servers are kept up to date automatically via automatic updating of the WordPress core as well as automatic updating of the the website’s plugins and themes.
There are literally thousands of individual pieces of software that must work in unison to operate most websites. These are developed by many more thousands of developers around the world. Unfortunately, no company can guarantee that a website will never get hacked. They can only mitigate security compromises and hope against the worst.
Restoring your Website
Regardless of which of the two situations above may have led to your website’s issues, your website will most likely need to be restored. That’s because after a bad actor or a hack back doors into the site will most likely have been installed for the bad actors to gain access again.
Many Internet companies claim to have automatic backups. In most of those, those backups are accessible to the user in their account. If the account is hacked, how safe do you suppose that is?
Some Internet companies delete and account upon a website being hacked. In those cases I have seen many left with no website or backup as a result.
What I believe is most important regarding this topic is the manner in which our WordPress sites are backed up every day for 30 days. Our backups are made to separate servers – external to those your the site operates on. For security reasons, the site administrators do not have access to these backups. So even with a site administrator’s compromised passwords there is no access to the backups. With these backups we can usually restore an average site in about 10-30 minutes if it needs restoring. And we can go back as far back as 30 days. We would only bill our web client for the 10-30 minutes (again – for an average website) which results in only a minor charge to restore it. Note that some websites are extremely large and require much more time to restore but these are very rare).
In my experience running CharlesWorks since 1998, we’ve built and handled more than 5,000 websites. At this point in time, I do not recall the last time a website we built and totally maintained was hacked (unfortunately I recall several instances of sites maintained by others that failed to ensure the site was updated and/or had their passwords compromised).
Sites getting hacked for out of date software happens far less frequently (if at all) when security updates are kept up to date and bad actors are kept out.
I hope this helps you understand a little more about this topic.
by Charles Oropallo | Jul 4, 2021 | Do-It-Yourself, Security, The CW Corner, Website Development, Website Updates
Here we are at the 4th of July of 2021 already! The loss of life suffered in 2020 was horrendous. Yet there are people who still do not think in terms of helping their fellow citizens – and themselves – by being vaccinated. The vaccine misinformation mills are in full production.
So think about this: Exactly who benefits when we don’t vaccinate? When more of us are ill and can’t work, the economy suffers. There is no way the government wants that. They want us to all work so they can collect taxes from our labor. Enemies of America benefit when we don’t vaccinate. Who benefits when we do? We all benefit. The economy will return to normal – as will our lives.
At CharlesWorks we all chose to be vaccinated. Each of us employed here cares about ourselves and our clients. So when you make an appointment with us in person you can at least rest assured we have taken steps indicating we care about you.
The CharlesWorks policy is that the COVID unvaccinated need not apply. That is one of the many ways we show we care about others.
Vaccination will help us return to normalcy. It is a small thing to do. It is the patriotic thing to do. It is the right thing to do.
by Charles Oropallo | Jan 3, 2021 | Do-It-Yourself, Technical Help, The CW Corner, Website Development, WordPress
I wanted to create a custom HTML code function, so made one that will generate a line feed. I tested it to neaten up the output from my favorite WordPress statistics plugin: WP-Statistics by Verona Labs.
This shortcode gives the ability to add line feeds to WordPress page, post or report outputs to improve their readability. The function can easily be modified to generate any HTML output by doing this:
- rename “newline” in the “add_shortcode” line to whatever you’d like the shortcode to be named
- adjust the HTML code inside the quotes in the “return” line
In this example, we’ll create the line break shortcode.
Creating the Line Break Shortcode
Adding shortcodes in WordPress is easily accomplished by simply inserting the appropriate coding for the shortcode into your child theme’s functions.php file.
Note: Child themes should always be used. Changes made directly to the parent theme’s files are usually overwritten each time the parent theme is updated.
To add the code, first back up your site and then do the following:
- Log into the WordPress Dashboard as an administrator
- Navigate to Appearance > Theme Editor
- Select Theme Functions (functions.php) under Theme Files in the right column
- Add the short function code lines below
/* -- Start of line breaks shortcode --*/
function line_break_shortcode() {
return '<br />';
}
add_shortcode( 'newline', 'line_break_shortcode' );
/* -- End of line break shortcode --*/
Adding Line Breaks
Once the code has been added to your functions.php file, all you have to do is add the
shortcode in your text to generate a line feed at that point. The beauty of doing this as a shortcode is that it can be inserted in places that do not normally allow you to add them – like in the email output of the WP-Statistics plugin.
Note: When testing your output from the WP-Statistics plugin, there is a convenient feature that allows you to send output every minute to see what you will be sending. As a rule I normally have the report set to send daily.
A Working Example
There were a couple of WP-Statistics report items that were of particular interest to me. One is the last post date. This is handy as a reminder when one should add one or more posts to a site – especially a blog – so the site content doesn’t appear stale (or as an alternative, simply do not show blog post creation dates). Even if you are not displaying the post dates on the site, it is good to know when you last posted something.
An example of the report pattern I used was this (note that in some WordPress themes the “[” and “]” characters in the example below display as repeated – there should only be one “[” opening shortcode character and one “]” closing shortcode character surrounding the shortcode itself when you use it):
WP Statistics report for https://CWCorner.com WordPress site:
[newline]
_______________________________________________
[newline]
[newline]
Last post date: [wpstatistics stat=lpd]
[newline]
Total Site Posts: [wpstatistics stat=postcount]
[newline]
Total Site Pages: [wpstatistics stat=pagecount]
[newline]
Total Site Users: [wpstatistics stat=usercount]
[newline]
Online Users at Report Time: [wpstatistics stat=usersonline]
[newline]
_______________________________________________
[newline]
[newline]
Today's Visitors so far: [wpstatistics stat=visitors time=today]
[newline]
Today's Visits so far: [wpstatistics stat=visits time=today]
[newline]
Yesterday's Visitors: [wpstatistics stat=visitors time=yesterday]
[newline]
Yesterday's Visits: [wpstatistics stat=visits time=yesterday]
[newline]
_______________________________________________
[newline]
[newline]
Total Visitors: [wpstatistics stat=visitors time=total]
[newline]
Total Visits: [wpstatistics stat=visits time=total]
[newline]
_______________________________________________
[newline]
[newline]
End of WP Statistics Report.
[newline]
I used the underline characters to separate various parts of the output for clarity. This report pattern generated a nicer, more readable report that even looked great when viewing it on my cell phone.
While I initially added this function as a way to neaten up the output of the WP-Statistics email report – the function should work just about anyplace in WordPress except in the PHP coding itself.
by Charles Oropallo | Dec 15, 2020 | Do-It-Yourself, Internet, Security, Technical Help, The CW Corner, Website Development, WordPress
Akismet provides a convenient and free way to protect your personal WordPress site or blog from spam.
Many times we’d like to allow comments to be left on our WordPress site. The hassle with this can be the tremendous amounts of spam that come through the forms on websites.
Akismet is a compact WordPress plugin that filters the incoming comments. It is pretty straightforward to use and pretty easy to set up as well.
Install the Akismet plugin
The first step in this process is to ensure that the Akismet plugin is installed in your WordPress website:
-
-
- Log into your WordPress website’s dashboard as an administrator
- Click on Plugins in the left dashboard navigation column
- Look and see if Akismet is listed – if it is – and it is not activated you can proceed to the Akismet Setup step below – otherwise
- Click on Add New under Plugins in the dashboard navigation column
- If you don’t see Akismet in the plugins, then in the text box to the right of the work Keyword in the row starting with Featured type in Akismet – then click on its Install Now button. Do not activate it yet.
Perform the Akismet Setup
To set up Akismet in your website, you will need an API code from the Akismet site. The first step in that process is to navigate to:
https://akismet.com/plans
This (as of the time of this writing) brings you to a page that should look similar to the screenshot below.
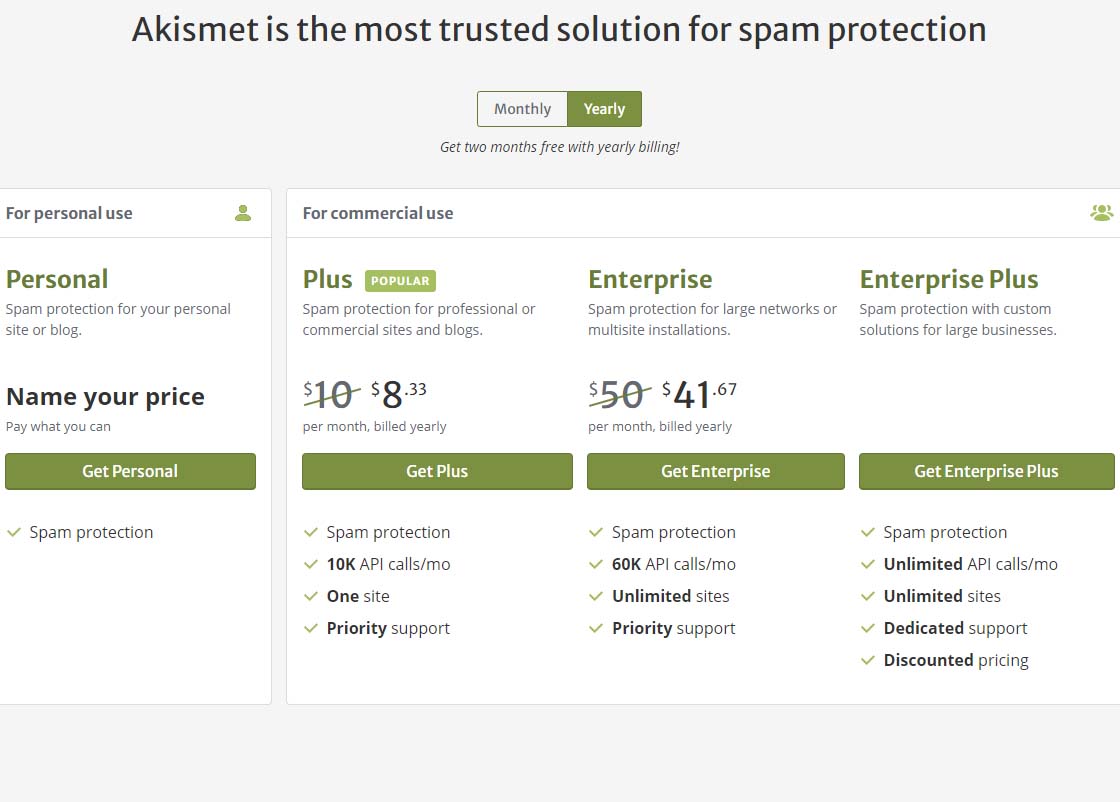 Akismet offering pricing page
To get the free version of Akismet comment spam protection, you will need to click on the Get Personal button on the above page.
Once you’ve done that, you should see a page similar to the one below. Before attempting to fill out anything on this page, we need to set that $36 / YEAR to $0 / YEAR. Click on the $36 / YEAR box and drag it to the left.
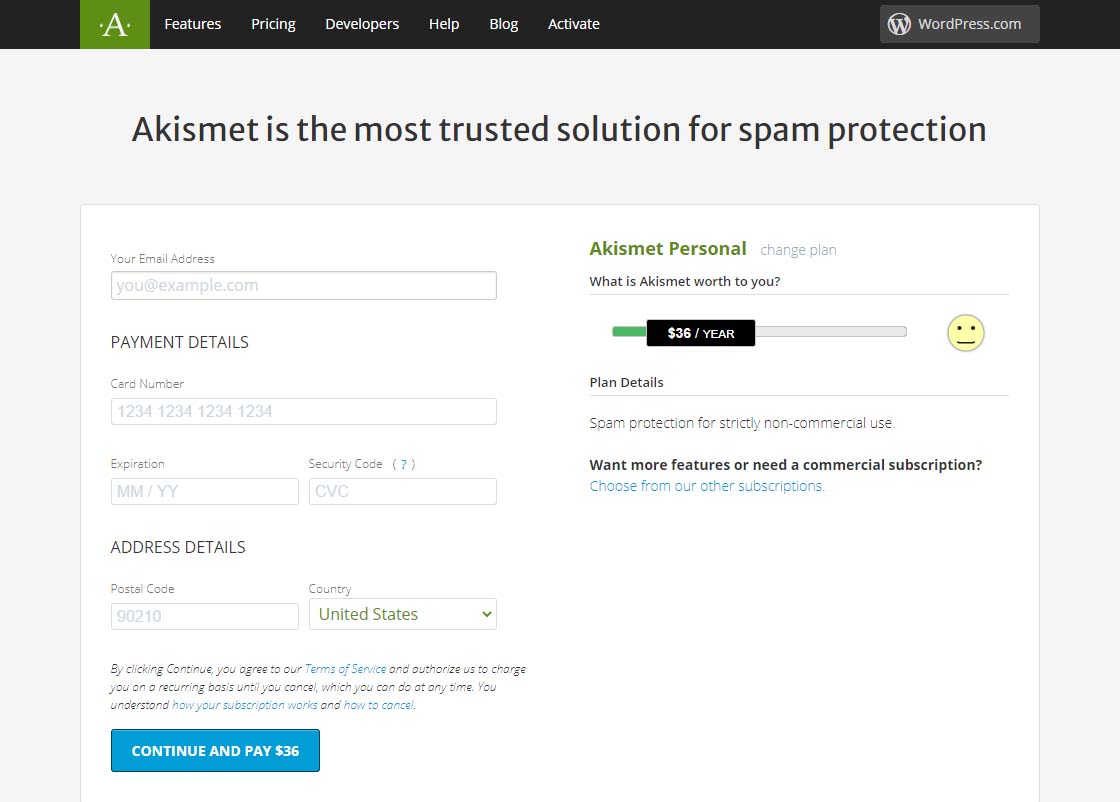 Akismet Default $36 per year page
Dragging that $36 / YEAR box to the left should change the page to display something like the one below showing 0$ / YEAR. You can also see that the information to fill in has changed.
Akismet $0 per year page
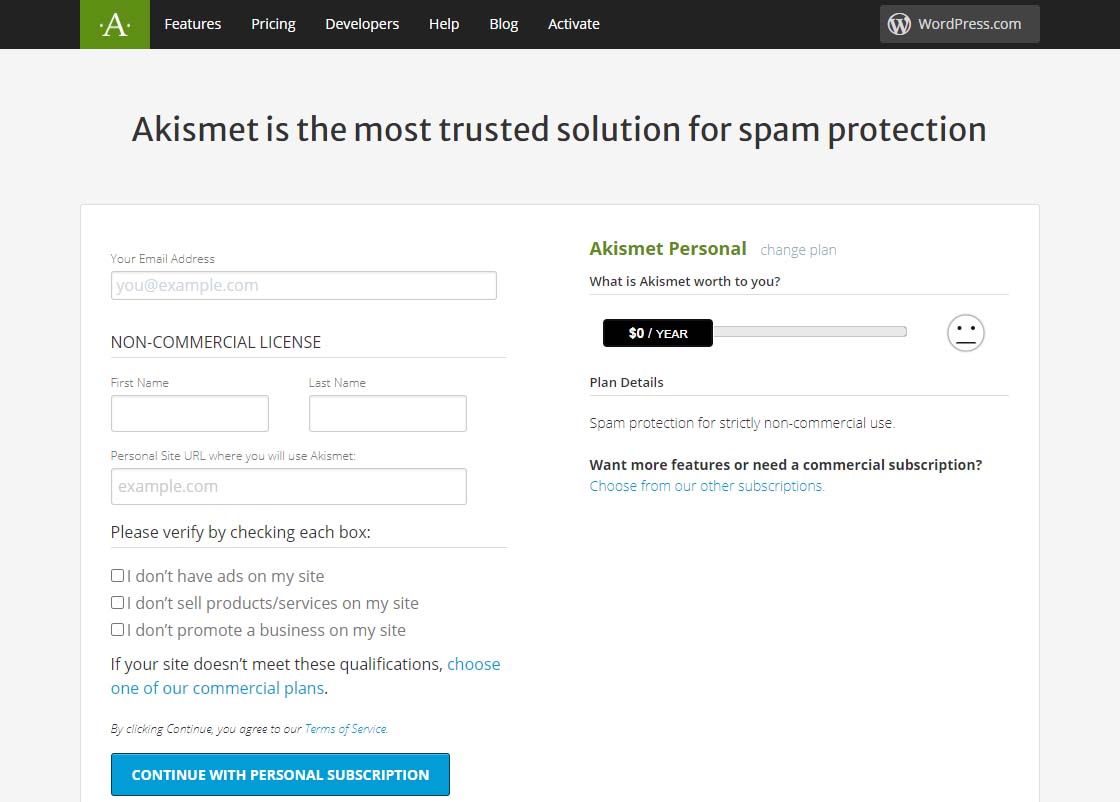 Akismet $0 per year page
Now fill in the information completely. Note that you need to be able to check all three checkboxes indicating the following:
-
-
- you don’t have ads on your site
- you don’t sell products/services on your site
- you don’t promote a business on your site
If these are the case, then you will qualify for a free, personal plan.
All you have to do once you have gotten this far is follow the directions on the page below.
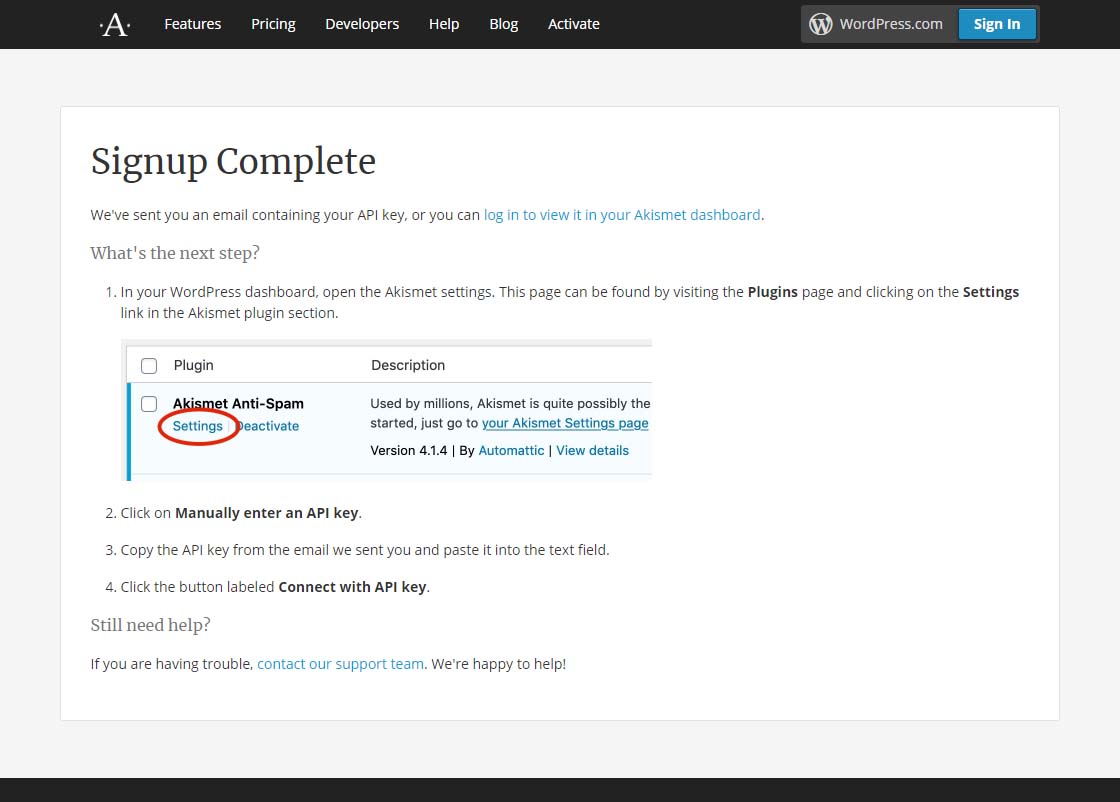 Akismet signup complete page
Finally, it is suggested that while on that settings page in Akismet, you can choose to show the number of approved comments beside each comment author and choose whether to show a privacy notice or not. Then just click the Save Changes button and you are on your way!


 European Union General Data Protection Regulation Compliant