by Charles Oropallo | Jan 17, 2025 | Security, Technical Help
Recently, I encountered an issue while attempting to renew an SSL certificate for one of my domains, (let’s call it) testdomain.com, using Let’s Encrypt on a server running Virtualmin on Debian 12. The process was more complicated than I expected due to a small oversight that many others could easily make. This article details my experience, the errors I encountered due to Let’s Encrypt rate limits (which I didn’t know existed), and steps to avoid or resolve such issues.
The Problem: Let’s Encrypt Rate Limits for Failed Authorizations
 A padlock that shows with an encrypted site using https in some browsers.
Let’s Encrypt provides free SSL certificates for securing websites. However, it enforces rate limits to ensure fair usage and prevent abuse. While attempting to renew the SSL certificate for testdomain.com, I discovered that the DNS settings were not pointed to my server, causing repeated failed validation attempts. By the time I fixed the DNS settings, I had hit Let’s Encrypt’s rate limit for failed authorizations.
This limit restricts requests for the same domain to 5 failed attempts per hour. Once you hit this limit, you must wait for the cooldown period to expire before trying again.
How the Error Appeared in Virtualmin
In the Virtualmin interface, I attempted to renew the certificate by navigating to:
- Virtualmin > Server Configuration > SSL Certificate
- Clicking on the Let’s Encrypt tab
- Ensuring the domain and subdomain (e.g.,
testdomain.com and www.testdomain.com) were selected
- Clicking the Request Certificate button
The renewal process failed with an error that Virtualmin reported as “an unknown issue.” Upon further investigation, I found the detailed error logs in the Let’s Encrypt log file located at:
/var/log/letsencrypt/letsencrypt.log
From the log, I saw this message:
urn:ietf:params:acme:error:rateLimited :: There were too many requests of a given type :: too many failed authorizations (5) for "testdomain.com" in the last 1h0m0s, retry after [time].
Understanding Let’s Encrypt Rate Limits
Let’s Encrypt enforces several types of rate limits. Here are the key ones:
- Failed Validation Limit:
- 5 failed validations per domain per hour.
- This applies to any validation failure, such as DNS misconfigurations or inaccessible
.well-known/acme-challenge directories.
- Duplicate Certificate Limit:
- 5 identical certificates per week.
- If you request the same set of domains repeatedly, you’ll hit this limit.
- Certificates per Registered Domain:
- 50 certificates per registered domain per week.
- All subdomains count toward this limit.
- Account-Level Requests:
- 50 certificates per account per week.
These limits are described in detail at Let’s Encrypt’s rate limit documentation.
Diagnosing the Problem
If you encounter a similar issue, here are the steps to diagnose and resolve it:
1. Check DNS Settings
- Ensure the domain’s DNS A records correctly point to your server.
- Use tools like
dig or online DNS propagation checkers to verify.
2. Verify Webroot Accessibility
3. Examine Let’s Encrypt Logs
4. Check Cooldown Period
- If you’ve hit the rate limit, the log will indicate a
Retry-After time in UTC. Convert it to your local timezone to determine when you can retry.
5. Dry Run Your Request
Steps to Avoid Future Issues
1. Ensure DNS Settings Before Requesting Certificates
- Double-check that DNS records point to the correct server and have propagated globally before initiating an SSL request.
2. Test Webroot Configuration
- Verify that the
.well-known/acme-challenge/ directory is accessible for all domains you’re requesting.
3. Use the Dry-Run Option
- Always test with
--dry-run before making a live request to avoid hitting limits.
4. Automate Renewals
- Virtualmin and Certbot support automated renewals. Ensure the cron job is configured correctly and DNS remains stable.
5. Avoid Forcing Duplicate Requests
- Options like
--duplicate and --force-renewal can lead to unnecessary requests. Only use them when absolutely necessary.
Conclusion
Hitting Let’s Encrypt’s rate limits can be frustrating, but understanding the causes and solutions can save time and effort. By checking DNS settings, verifying webroot accessibility, and using dry runs, you can prevent failed authorizations and avoid cooldown periods.
If you’re using Virtualmin, remember to check the Let’s Encrypt logs for detailed error messages, and plan your certificate renewals carefully to stay within the rate limits. Hopefully, my experience with testdomain.com helps you navigate and prevent similar issues.
As always, proactive testing and attention to detail go a long way in maintaining a secure and smoothly running server.


by Charles Oropallo | Dec 16, 2024 | Do-It-Yourself, Technical Help, Website Development, WordPress
SimplePractice: Incorporating its Widget into your WordPress Divi Website
This article is about adding the SimplePractice widget to your WordPress website that uses the Divi theme. I’ll explain what SimplePractice is and get into how to install its widget into your WordPress Divi website.
Simplifying Practice Management for Mental Health Professionals
 SimplePractice is a trusted all-in-one platform designed to make life easier for mental health professionals and other wellness practitioners. See https://SimplePractice.com for more details. It streamlines essential administrative tasks like scheduling, billing, documentation, and client communication, allowing practitioners to focus on what truly matters—their clients. With a user-friendly interface and powerful tools, it’s an ideal solution for solo practitioners and small group practices.
One of the standout features is its online scheduling tool, which lets clients book appointments through a secure, HIPAA-compliant client portal. This portal also allows clients to complete intake forms, sign documents, and even message their provider—all in one place. For therapists who offer virtual sessions, the telehealth integration enables seamless video appointments without the need for third-party apps.
SimplePractice also simplifies billing and insurance management. Providers can create invoices, process payments, and submit insurance claims directly through the system. Plus, its customizable progress notes and treatment plan templates make maintaining records both quick and efficient.
What makes SimplePractice shine is its simplicity. The platform is intuitive and easy to navigate, with minimal learning curves for both practitioners and their clients. The robust support team and extensive online resources ensure any questions are resolved quickly.
Whether it’s automating reminders, securely managing client data, or customizing a practice’s workflow, SimplePractice makes running a private practice straightforward and stress-free. It’s the tool busy professionals rely on to save time, stay organized, and provide exceptional care.
The SimplePractice appointment request widget can be incorporated into a development domain for your client’s pending Divi site and ultimately in the live site. Here’s how you can achieve this:
Step 1: Review the Widget Code
Once you have the widget code from the client, you need to verify its structure. Typically, it includes a <script> tag provided by SimplePractice. For example:
The data-sp-client-id is unique to your client’s SimplePractice account, so ensure that value matches.
Step 2: Add the Widget Code to the Divi Site
In Divi, you can embed custom code into the site using the Code Module or Theme Builder:
- Using the Divi Code Module:
- Open the page or section where you want to display the widget.
- Add a Code Module within the desired row or column.
- Paste the SimplePractice widget code into the module.
- Save the changes and preview to ensure the widget appears as expected.
- Using Divi Theme Builder (if the widget should appear site-wide):
- Navigate to Divi > Theme Builder in the WordPress dashboard.
- Create or edit a custom header, footer, or body section.
- Add a Code Module and paste the widget code.
- Assign the template to the desired pages or the entire site.
Step 3: Customize the Widget (Optional)
The Customizing Your Widget section in the SimplePractice documentation explains how you can:
- Change colors, fonts, and styles to match the Divi site’s design.
- Customize settings by modifying the
<script> code parameters.
If your client’s code already includes customization, verify if it aligns with the new site’s look. For further adjustments, update the styles within the widget script.
Step 4: Use the Development Domain
SimplePractice widgets do not rely on a specific domain to function, as long as the data-sp-client-id is correct. You can install and test the widget on the development domain without any issues. Once the site goes live on the actual domain, the widget should still work without changes.
However, after the site goes live, it’s good practice to:
- Confirm the widget works properly on the live domain.
- Recheck any customized URLs or redirects tied to the widget to ensure they match the live setup.
Step 5: Test the Integration
- Navigate to the development site.
- Test the widget to ensure it displays and works correctly (e.g., appointment requests can be submitted).
- Check for any conflicts with other scripts or plugins on the Divi site.
by Charles Oropallo | Nov 26, 2024 | Do-It-Yourself, Technical Help
Resolving Default Page Mismatches
 We had a website transferred to us for hosting by a client who did not know about resolving default page mismatches. This occurs, for example, the a page not found error happens when a site visitor is clicking on your navigation trying to get back to the home page. When hosting a website, ensuring that the correct default page is served when visitors navigate to the root domain (e.g.,
 exampledomain.com) is critical. A mismatch between menu navigation items and the actual default page can confuse visitors and lead to a poor user experience. Below, I’ve outlined several methods to address such issues. Each method depends on the tools and access available on your hosting environment.
1. Redirect Default Page Using a New default.htm File
The simplest solution is to create a default.htm file that redirects visitors to the correct index.html file.
Steps:
- Create a new file named
default.htm in the root directory of the website.
- Add the following HTML code to the file:
<!DOCTYPE html>
<html lang="en">
<head>
    <meta http-equiv="refresh" content="0;url=index.html">
    <title>Redirecting...</title>
</head>
<body>
    <p>If you are not redirected, <a href="index.html">click here</a>.</p>
</body>
</html>
- Save and upload the file to the server.
When visitors access exampledomain.com/default.htm, they will be automatically redirected to index.html.
2. Set Default Pages in Virtualmin
If your hosting server uses Virtualmin, you can configure the default pages it prioritizes when serving the site.
Steps:
- Log in to Virtualmin.
- Navigate to the specific domain by selecting it from the dropdown.
- Go to Server Configuration > Website Options.
- Locate the option for “Default index file names” or similar.
- Add
default.htm to the list if it is not already present. For example:
index.html index.htm default.htm
- Save the changes and reload the website.
With this configuration, default.htm will be recognized as a valid default page alongside index.html.
3. Use an .htaccess File
You can also use an .htaccess file to specify which files should be served as default pages.
Steps:
- Access the root directory of the website via FTP or the file manager.
- Open or create a file named
.htaccess.
- Add the following lines to the file:
DirectoryIndex default.htm index.html index.htm
- Save the file and upload it to the server.
This tells the server to prioritize default.htm as the default page. If default.htm is not found, it will fall back to index.html or other specified files.
4. Update Navigation Links in the Website’s Code
If all navigation menu items point to default.htm, you can update the site’s HTML files to point to index.html instead.
Steps:
- Download the HTML files that contain navigation links.
- Search for
default.htm in the code and replace it with index.html.
- Save and upload the updated files to the server.
This ensures that navigation links point to the correct file and prevents further confusion.
5. Configure the Web Server Directly
For advanced users with root access to the server, you can modify the web server’s configuration files to set the default page order.
Apache Servers:
- Edit the Apache configuration file (e.g.,
/etc/httpd/conf/httpd.conf or /etc/apache2/apache2.conf).
- Find the
DirectoryIndex directive and modify it:
DirectoryIndex default.htm index.html index.htm
- Save the file and restart Apache:
systemctl restart apache2
Nginx Servers:
- Edit the server block configuration file (e.g.,
/etc/nginx/sites-available/exampledomain.com).
- Modify the
index directive:
index default.htm index.html index.htm;
- Save the file and restart Nginx:
systemctl restart nginx
6. Combine Redirect and Navigation Fixes
For maximum compatibility and user experience, you can combine several methods. For example:
- Use the
.htaccess file or Virtualmin to prioritize default.htm.
- Add a redirect in
default.htm for edge cases.
- Update all navigation links to
index.html.
Final Thoughts on Resolving Default Page Mismatches
Choosing the right method depends on your hosting setup and access level. If you’re looking for a quick fix, creating a redirect in default.htm is the easiest option. For a more permanent and scalable solution, consider updating the server configuration or .htaccess file.
Always remember to test changes thoroughly to ensure they work as expected before making them live. This will prevent any disruptions for your website’s visitors.
And, finally, at CharlesWorks we take care of these types of issues for you.
by Charles Oropallo | Oct 18, 2024 | Do-It-Yourself
 If you secure many sites with free Let’s Encrypt SSL, you may hit a wall. Suddenly, certificate requests stop cold. One day everything works. The next, you see rate-limit errors and wonder what happened.
Here’s the thing. Let’s Encrypt secures over 350 million websites with free SSL. To keep things stable and safe, they enforce strict rate limits. These limits can surprise even seasoned developers. They bite hardest when securing many domains or subdomains at once.
Understanding these limits prevents headaches. It also keeps your sites secure and your business running. I’ll explain what the limits mean. I’ll share five practical steps to avoid SSL issues before they happen.
What Are Let’s Encrypt Rate Limits?
Think of Let’s Encrypt rate limits like a busy restaurant. It can serve only so many guests each hour. They are not there to hassle you. They ensure fair access and protect the system.
The key limit is 50 certificates per registered domain every 7 days. “Registered domain” means your eTLD+1, or main domain. If you own example.com, all subdomains share that weekly pool. That includes www, blog, and shop subdomains.
That’s not the only limit. You get 5 failed validation attempts per domain per hour. Repeated failures trigger a temporary lockout. Common causes include DNS or firewall issues. There’s also a duplicate certificate limit of 5 per week. Renewals do not count against the 50-certificate quota.
Account creation is limited too: 10 accounts per IP every 3 hours. This prevents abuse through mass accounts. It can also affect legitimate teams that need several accounts.
Step 1: Use Wildcard Certificates for Multiple Subdomains
Here’s your first defense against rate limits. Use a single wildcard certificate, not many subdomain certificates. One wildcard covers all subdomains under your domain.
A wildcard for *.example.com secures www, blog, shop, and new subdomains. You issue only one certificate. This slashes issuance volume and stays within Let’s Encrypt limits.
Even better, a single certificate can list up to 100 domains. Managing many brands? Combine domains into fewer certificates. One cert can cover yourcompany.com, .net, and .org.
Look at your setup. Are you requesting one certificate per subdomain? If so, you burn limits quickly. Switching to wildcard certificates is often the top fix.
Step 2: Test in the Staging Environment First
Before deploying live, test in Let’s Encrypt’s staging environment. It’s a safe practice kitchen. Mistakes don’t affect customers.
Staging has relaxed limits: 50 new registrations per IP per 3 hours. Production allows only 10. Use staging to test SSL, fix DNS, and refine deployment.
Many teams skip this step in a rush to go live. That’s when rate-limit problems strike. You issue, it fails, you retry, and hit five failures. Now you must wait.
Follow this rule. Do not issue a production certificate until staging succeeds. Spend 15 extra minutes. It could save days later.
Step 3: Implement Protective Safeguards
Smart hosting platforms add safeguards to prevent runaway certificate requests. You should do the same.
Many platforms lock SSL provisioning after three failures. They stop before Let’s Encrypt’s limit of five. That buffer prevents retry loops and protects weekly limits.
If you manage SSL yourself, add similar safeguards. Monitor requests per domain and per week. Create alerts near the limits. Add automatic delays between retries.
Do not rely on manual steps. SSL issues feel urgent, and pressure creates mistakes. Automation removes human error in Let’s Encrypt rate-limit management.
Step 4: Monitor and Space Out Certificate Requests
If you manage many sites or a SaaS, timing matters. Be strategic with certificate requests. Avoid securing everything at once.
Let’s Encrypt allows 10 certificates per IP every three hours. Migrating dozens at once? Pace your requests. Spread them over days, not one afternoon.
Keep detailed logs of issuance times and domains. This is essential for weekly limits. Know exact counts for each domain over seven days before requesting more.
Use a spreadsheet or database to track issuance dates, renewals, and limit usage. Seeing requests visually helps avoid accidental Let’s Encrypt limit hits.
Step 5: Fix Root Causes Before Retrying Failed Requests
This might be the most important step. When provisioning fails, do not retry immediately. The seven-day window also tracks failed attempts per domain.
Instead, find and fix the root cause. Common causes include DNS mistakes, blocked HTTP validation, or domain verification issues. Retrying without fixes only wastes your limits.
Some common issues to check when certificates fail:
- DNS records pointing to the correct IP address
- Firewall rules allowing HTTP validation on port 80
- Web server configuration properly handling validation requests
- Domain ownership verification working correctly
Follow this rule of thumb. Wait at least an hour between failures. Do not retry until you fix the specific problem. Many providers recommend this. It prevents accidental lockouts.
What Happens When You Hit Rate Limits
Despite your best efforts, you may still hit limits. When it happens, wait for the window to reset. The main certificate limit resets after seven days.
While you wait, consider alternatives. Issue wildcard certificates where missing. Consolidate domains into fewer certificates. For critical needs, consider a commercial CA as a temporary last resort.
Most important, learn from the incident. Review what happened. Update processes to prevent repeats. Confirm your safeguards work properly.
Remember, Let’s Encrypt rate limits keep the service stable for everyone. Follow the five steps. Use wildcards. Test in staging. Add safeguards. Monitor usage. Fix root causes early.
The key is proactive planning, not reactive troubleshooting. With preparation, you can keep sites secure without hitting these limits.
by Charles Oropallo | Sep 27, 2024 | Do-It-Yourself

You updated PHP on your hosting account and suddenly your WordPress site displays a white screen or error messages. Sound familiar? You're not alone. PHP updates break WordPress sites more often than you'd think, but the good news is that most issues have straightforward fixes.
The problem usually stems from outdated plugins, themes, or even WordPress core files that aren't compatible with newer PHP versions. Think of it like trying to run old software on a brand-new computer – sometimes it just doesn't work without updates.
Don't panic. Here's your step-by-step recovery plan to get your site back online and properly updated.
Step 1: Revert PHP Version Immediately
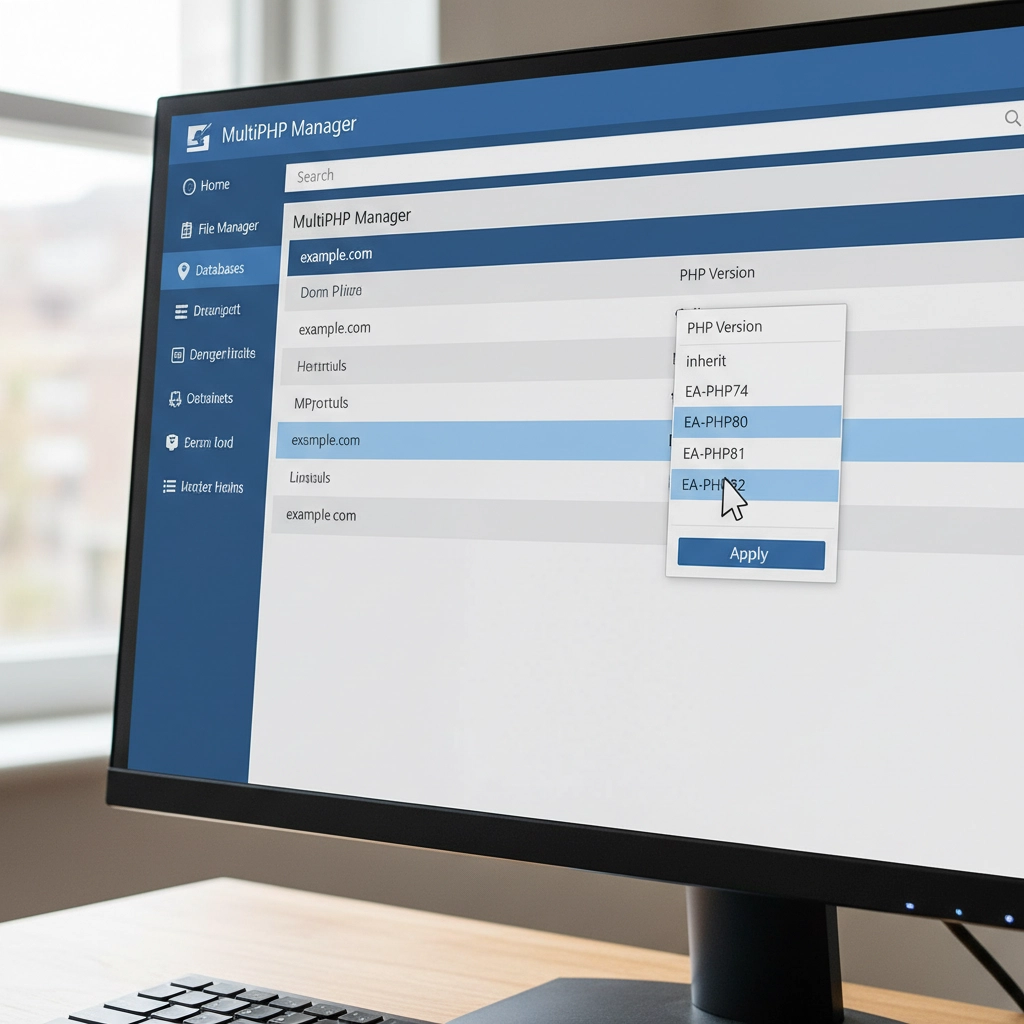
Your first priority is getting your site back online. Log into your hosting control panel (like cPanel) and find the PHP settings. This might be called "MultiPHP Manager," "PHP Version," or "Select PHP Version."
Switch back to your previous PHP version – usually PHP 7.4 or 8.0. Your site should come back online within minutes. This buys you time to properly diagnose and fix the underlying compatibility issues.
Remember, this is a temporary fix. Running outdated PHP versions leaves your site vulnerable to security threats. PHP 7.4 stopped receiving security updates in November 2022, and even PHP 8.0 support ended in November 2023.
Step 2: Create a Full Site Backup
Before making any changes, backup everything. Use a plugin like UpdraftPlus or your hosting provider's backup tool. You need both your website files and database.
Think of this as insurance. If something goes wrong during the update process, you can restore your site to its current working state. Many hosting providers offer one-click backups through their control panels.
Don't skip this step. I've seen too many sites get worse instead of better because someone tried to fix things without a safety net.
Step 3: Update WordPress Core, Themes, and Plugins
Head to your WordPress dashboard and navigate to Updates. Install all pending updates for WordPress core, your active theme, and plugins. Newer versions often include compatibility patches for recent PHP versions.
Pay special attention to plugins you haven't updated in months or years. Abandoned plugins are the biggest culprits in PHP compatibility issues. If you see plugins that haven't been updated in over two years, consider finding alternatives.
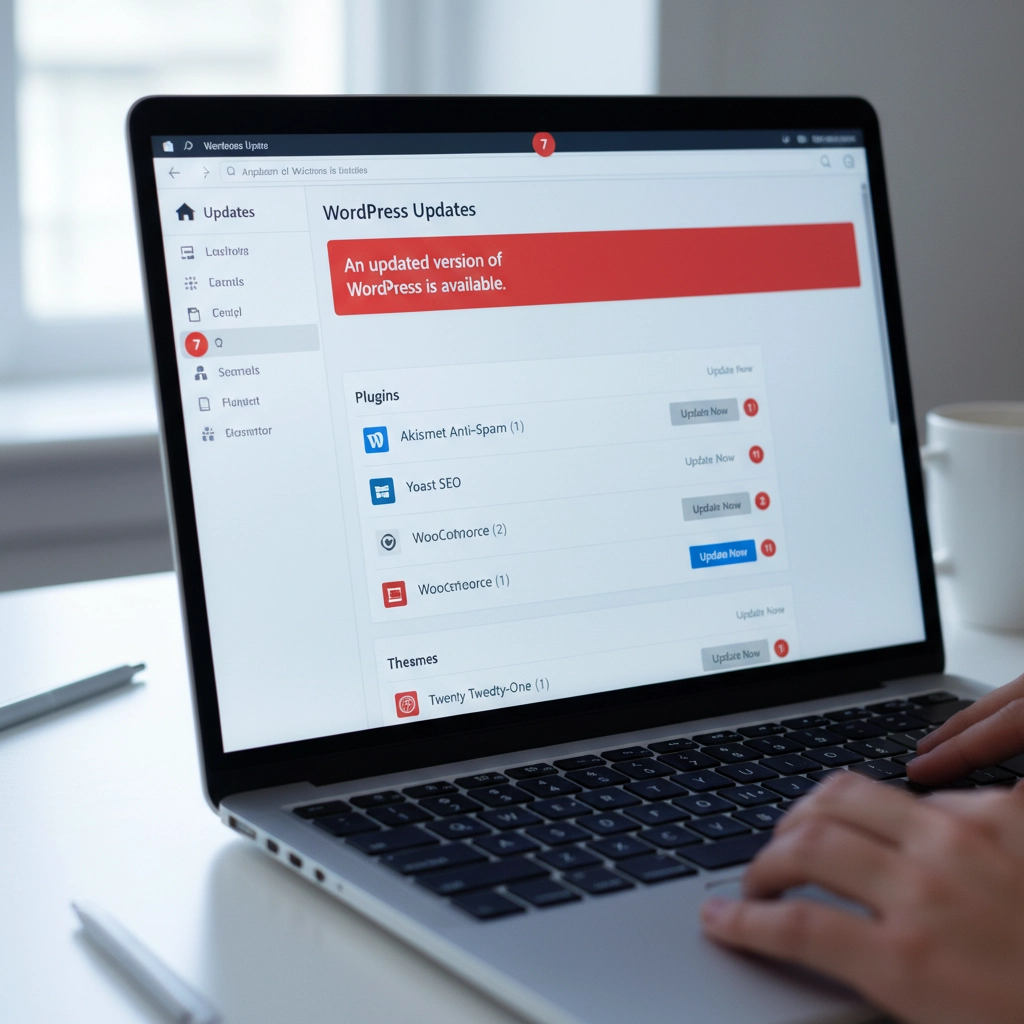
Update your active theme too. Custom themes from developers who no longer provide support can be particularly problematic. If your theme hasn't been updated recently, contact the developer or consider switching to a well-maintained alternative.
Step 4: Run a PHP Compatibility Check
Install the PHP Compatibility Checker plugin by WP Engine. This free tool scans your entire site and generates a report showing which themes and plugins won't work with newer PHP versions.
Run a scan targeting your desired PHP version (usually PHP 8.1 or 8.2). The report will flag specific files and functions that need attention. This gives you a roadmap for what needs fixing before you can safely update PHP.
The scan might take several minutes depending on your site size. Don't close your browser tab while it's running. The detailed report will show you exactly which plugins or themes are causing problems.
Step 5: Test in a Staging Environment
If your hosting provider offers staging sites, use one. Create a copy of your live site where you can safely test the PHP update without affecting visitors.
Apply the PHP update to your staging site first. If everything works correctly there, you can confidently update your live site. If problems occur, you can troubleshoot without any downtime.
Many hosts include staging tools in their control panels. WordPress.com, WP Engine, and SiteGround all offer easy staging environments. Some plugins like WP Staging can create staging sites on any host.

Step 6: Isolate Problematic Components
If your site still breaks after updating everything, you need to identify the specific culprit. Start by deactivating all plugins and switching to a default WordPress theme like Twenty Twenty-Four.
Try the PHP update again. If your site works with all plugins disabled and the default theme active, you know the problem is with a plugin or your theme.
Reactivate plugins one by one, testing your site after each activation. When your site breaks, you've found the problematic plugin. Do the same process with your theme by switching back to it after testing all plugins.
Step 7: Handle Incompatible Extensions
Found the troublemaker? You have several options. First, check if there's a newer version available. Plugin developers often release compatibility updates shortly after new PHP versions.
If no update exists, look for alternative plugins that provide the same functionality. The WordPress plugin directory has thousands of options, and newer plugins typically support current PHP versions.
For premium plugins or themes, contact the developer directly. Many offer compatibility updates for paying customers even if they haven't released public updates.
Sometimes you might need to hire a developer to update custom code or modify a theme. This is especially common with heavily customized sites or older premium themes.
Step 8: Reapply the PHP Update
Once you've resolved all compatibility issues, it's time to update PHP again. Go back to your hosting control panel and select your target PHP version.
Most sites work well with PHP 8.1 or 8.2. These versions offer significant performance improvements over older versions. WordPress officially supports PHP 8.0 and higher, with PHP 8.1 being the recommended version.
Apply the change and test your site thoroughly. Check your homepage, admin area, contact forms, and any special functionality like e-commerce checkout processes.
Step 9: Post-Update Monitoring
After updating PHP, monitor your site closely for the first few days. Clear all caches – server-level caches, plugin caches, and your browser cache.
Check your hosting control panel's error logs for any PHP errors or warnings. Look for the "Error Logs" section in cPanel or similar tools in other hosting panels. WordPress also creates debug logs if you enable debugging in wp-config.php.
Set up website monitoring tools to alert you if your site goes down. Services like UptimeRobot or Pingdom can send email alerts when problems occur.
Prevention Tips for Future Updates
Stay proactive with updates. Install WordPress, theme, and plugin updates regularly instead of letting them accumulate. Regular small updates are much safer than jumping multiple versions at once.
Remove unused plugins and themes. Every piece of code on your site is a potential compatibility problem. If you're not actively using a plugin, delete it completely.
Consider managed WordPress hosting. Companies like WP Engine, Kinsta, and Pressable handle PHP updates more carefully, often testing compatibility before applying updates to your site.
When to Get Professional Help
Some situations require expert assistance. If you're running a mission-critical e-commerce site, have heavily customized code, or feel overwhelmed by the technical steps, consider hiring a WordPress professional.
Custom-built themes and plugins often need developer attention for PHP compatibility. The cost of professional help is usually much less than the revenue lost from extended downtime.
Don't let pride keep your site broken. Sometimes the smartest move is admitting you need help and getting your site fixed quickly and correctly.
Your WordPress site doesn't have to break every time PHP updates. With proper preparation and systematic troubleshooting, you can keep your site running smoothly on current, secure PHP versions. The key is taking it step by step and not rushing the process.


 European Union General Data Protection Regulation Compliant